Get Started
Vald is a highly scalable distributed fast approximate nearest neighbor dense vector search engine.
Vald is designed and implemented based on Cloud-Native architecture.
This article will show you how to deploy and run the Vald components on your Kubernetes cluster. And, Fashion-mnist is used as an example of a dataset.
Overview
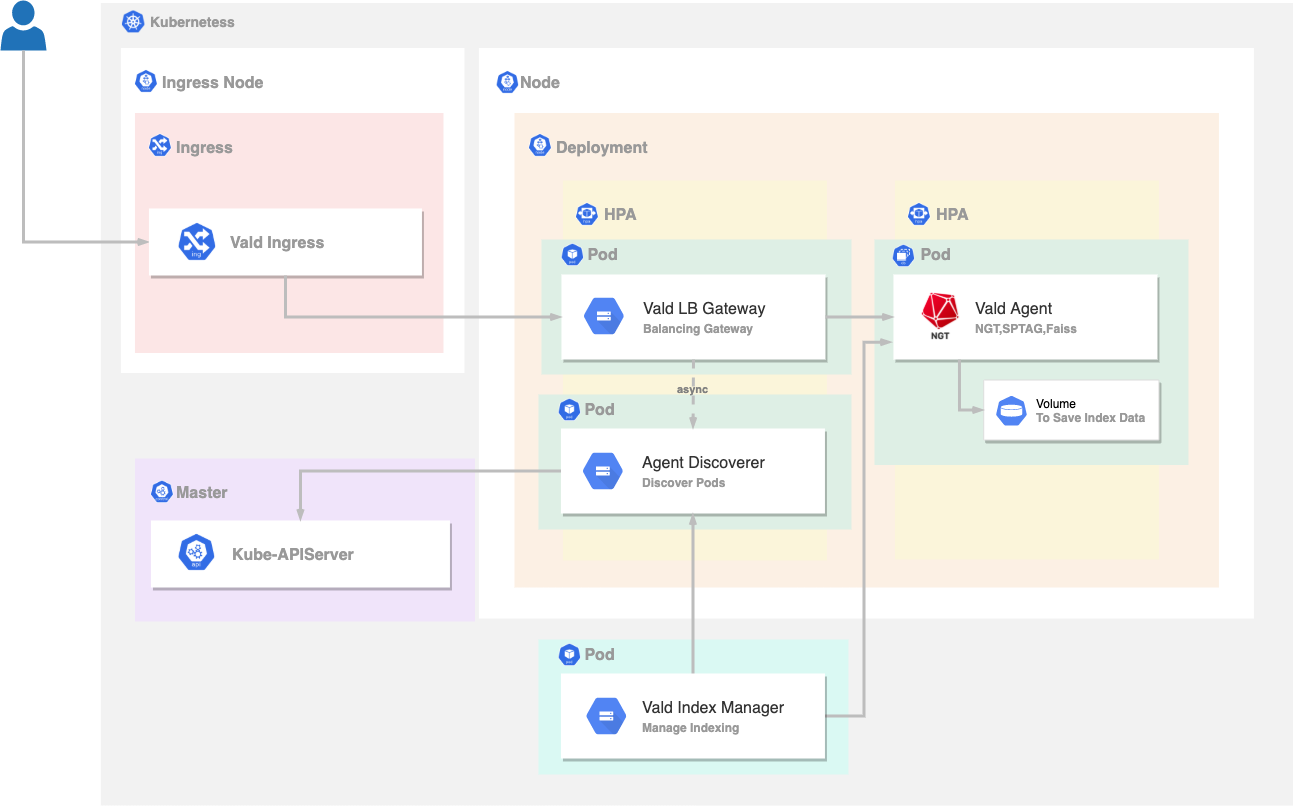
Before starting, let’s check the below image.
It shows the architecture image about the deployment result of Get Started.
The 4 kinds of components, Vald LB Gateway, Vald Discoverer, Vald Agent, and Vald Index Manager will be deployed to the Kubernetes.
The 5 steps to Get Started with Vald:
- Check and Satisfy the Requirements
- Prepare Kubernetes Cluster
- Deploy Vald on Kubernetes Cluster
- Run Example Code
- Cleanup
Requirements
- Kubernetes: v1.19 ~
- Go: v1.15 ~
- Helm: v3 ~
- libhdf5 (only required for get started)
Helm is used to deploying Vald on your Kubernetes and HDF5 is used to decode the sample data file to run the example.
If Helm or HDF5 is not installed, please install Helm and HDF5.
Installation command for Helm
curl https://raw.githubusercontent.com/helm/helm/master/scripts/get-helm-3 | bash
Installation command for HDF5
# yum
yum install -y hdf5-devel

# apt
apt-get install libhdf5-serial-dev

# homebrew
brew install hdf5
Prepare the Kubernetes Cluster
Prepare Kubernetes cluster
To complete get started, the Kubernetes cluster is required.
Vald will run on Cloud Service such as GKE, AWS. In the sense of trying to “Get-Started”, k3d or kind are easy Kubernetes tools to use.Apply Kubernetes metrics server
After creating your Kubernetes cluster, let’s apply Kubernetes metrics server.
kubectl apply -f https://github.com/kubernetes-sigs/metrics-server/releases/latest/download/components.yaml
kubectl wait -n kube-system --for=condition=ready pod -l k8s-app=metrics-server --timeout=600s
Deploy Vald on Kubernetes Cluster
This chapter shows the way to deploy Vald using Helm and to run on your Kubernetes cluster.
In this tutorial, you will deploy the basic configuration of Vald that is consisted of vald-agent-ngt, vald-lb-gateway, vald-discoverer and vald-manager-index.
Clone the repository
To use the
deployment yamlfor deploy, let’s clonevdaas/valdrepository.git clone https://github.com/vdaas/vald.git cd valdConfirm which cluster to deploy
kubectl cluster-infoDeploy Vald using Helm
# add vald repo into helm repo
helm repo add vald https://vald.vdaas.org/charts
# deploy vald on your kubernetes cluster
helm install vald vald/vald --values example/helm/values.yaml
Verify
When finish deploying Vald, you can check the Vald’s pods status following command.
kubectl get podsExample output
If the deployment is successful, all Vald components should be running.NAME READY STATUS RESTARTS AGE vald-agent-ngt-0 1/1 Running 0 7m12s vald-agent-ngt-1 1/1 Running 0 7m12s vald-agent-ngt-2 1/1 Running 0 7m12s vald-agent-ngt-3 1/1 Running 0 7m12s vald-agent-ngt-4 1/1 Running 0 7m12s vald-discoverer-7f9f697dbb-q44qh 1/1 Running 0 7m11s vald-lb-gateway-6b7b9f6948-4z5md 1/1 Running 0 7m12s vald-lb-gateway-6b7b9f6948-68g94 1/1 Running 0 6m56s vald-lb-gateway-6b7b9f6948-cvspq 1/1 Running 0 6m56s vald-manager-index-74c7b5ddd6-jrnlw 1/1 Running 0 7m12s
Run Example Code
In this chapter, you will execute insert vectors, search vectors, and delete vectors to your Vald cluster using the example code.
The fashion-mnist is used as a dataset for indexing and search query.
The example code is implemented Go and using vald-client-go, one of the official Vald client libraries, for requesting to Vald cluster.
Vald provides multiple language client libraries such as Go, Java, Node.js, Python, and so on.
If you are interested in, please refer to SDKs.
Port Forward
At first, port-forward is required to make request from your local environment possible.
kubectl port-forward deployment/vald-lb-gateway 8081:8081Download dataset
Download fashion-mnist that is used as a dataset for indexing and search query.
# move to the working directory
cd example/client

# download fashion-mnist testing dataset
wget http://ann-benchmarks.com/fashion-mnist-784-euclidean.hdf5
Run Example
We use
example/client/main.goto run the example.
This example will insert and index 400 vectors into the Vald from the fashion-mnist dataset via gRPC. And then after waiting for indexing, it will request for searching the nearest vector 10 times. You will get the 10 nearest neighbor vectors for each search query.
Run example codes by executing the below command.# run example go run main.goThe detailed explanation of example code is here
This will execute 6 steps.init
Import packages
example code
package main

import (
    "context"
    "encoding/json"
    "flag"
    "time"

    "github.com/kpango/fuid"
    "github.com/kpango/glg"
    "github.com/vdaas/vald-client-go/v1/payload"
    "github.com/vdaas/vald-client-go/v1/vald"

    "gonum.org/v1/hdf5"
    "google.golang.org/grpc"
)
Set variables
The constant number of training datasets and test datasets.
example code
const (
    insertCount = 400
    testCount = 20
)
The variables for configuration.
example code
const (
    datasetPath         string
    grpcServerAddr      string
    indexingWaitSeconds uint
)
Recognition parameters.
example code
func init() {
    flag.StringVar(&datasetPath, "path", "fashion-mnist-784-euclidean.hdf5", "set dataset path")
    flag.StringVar(&grpcServerAddr, "addr", "127.0.0.1:8081", "set gRPC server address")
    flag.UintVar(&indexingWaitSeconds, "wait", 60, "set indexing wait seconds")
    flag.Parse()
}
load
Loading from fashion-mnist dataset and set id for each vector that is loaded. This step will return the training dataset, test dataset, and ids list of ids when loading is completed with success.
example code
ids, train, test, err := load(datasetPath)
if err != nil {
    glg.Fatal(err)
}
Create the gRPC connection and Vald client with gRPC connection.
example code
ctx := context.Background()

conn, err := grpc.DialContext(ctx, grpcServerAddr, grpc.WithInsecure())
if err != nil {
    glg.Fatal(err)
}

client := vald.NewValdClient(conn)
Insert and Index
Insert and Indexing 400 training datasets to the Vald agent.
example code
for i := range ids [:insertCount] {
    _, err := client.Insert(ctx, &payload.Insert_Request{
        Vector: &payload.Object_Vector{
            Id: ids[i],
            Vector: train[i],
        },
        Config: &payload.Insert_Config{
            SkipStrictExistCheck: true,
        },
    })
    if err != nil {
        glg.Fatal(err)
    }
    if i%10 == 0 {
        glg.Infof("Inserted %d", i)
    }
}
Wait until indexing finish.
example code
wt := time.Duration(indexingWaitSeconds) * time.Second
glg.Infof("Wait %s for indexing to finish", wt)
time.Sleep(wt)
Search
Search 10 neighbor vectors for each 20 test datasets and return a list of the neighbor vectors.
When getting approximate vectors, the Vald client sends search config and vector to the server via gRPC.
example code
glg.Infof("Start search %d times", testCount)
for i, vec := range test[:testCount] {
    res, err := client.Search(ctx, &payload.Search_Request){
        Vector: vec,
        Config: &payload.Search_Config{
            Num: 10,
            Radius: -1,
            Epsilon: 0.01,
        }
    }
    if err != nil {
        glg.Fatal(err)
    }

    b, _ := json.MarshalIndent(res.GetResults(), "", " ")
    glg.Infof("%d - Results : %s\n\n", i+1, string(b))
    time.Sleep(1 * time.Second)
}
Remove
Remove 400 indexed training datasets from the Vald agent.
example code
for i := range ids [:insertCount] {
    _, err := client.Remove(ctx, &payload.Remove_Request{
        Id: &payload.Object_ID{
            Id: ids[i],
        },
    })
    if err != nil {
        glg.Fatal(err)
    }
    if i%10 == 0 {
        glg.Infof("Removed %d", i)
    }
}
Cleanup
In the last, you can remove the deployed Vald Cluster by executing the below command.
helm uninstall vald
Next Steps
Congratulation! You completely entered the Vald World!
If you want, you can try other tutorials such as:
For more information, we recommend you to check: